
Monday, September 15, 2008
Monday, September 01, 2008
なんばあい NANBA AI~FRESH INDIGO

Using the fresh leaves of indigo (Polygonum tinctorium) for dyeing is an alternate way of using indigo. There are many recipes on the internet for dyeing with fresh leaves that give wonderful clear hues of blue, on silk, cotton and wool.
Time: About 4 hours
1. Pick 16 oz. of fresh indigo leaves, put them in a bucket and add just enough hot tap water to cover the leaves.
2. Heat the solution to 160 degrees F. over a period of two hours. Don’t heat it too quickly.
3. Strain the liquid and squeeze liquid from the indigo leaves into the strained liquid.
4. Add 2 Tbsp. baking soda to the liquid and stir a little.
5. Pour the liquid from one bucket to another for a few minutes, or until the solution turns dark green/blue. This oxidizes the dissolved indoxyl, changing it to indigo.
6. Dissolve 2 Tbsp. Thiox in warm water, pour it into the dyebath, cover and set the pot in a larger container of water that is just hot enough to keep the dyebath at 100 to 120 degrees F. for about an hour.
7. Meanwhile, soak 2 to 4 oz. of yarn in hot water.
8. When the dyebath has turned yellow, add the wet yarn—carefully, to minimize adding oxygen to the solution. Leave it in the dye for 20 minutes. Remove it gently and let it oxidize by hanging it on a wooden rack. The yarn will turn blue as it reacts with oxygen in the air.
9. Let the yarn dry for as long as it soaked in the bath. One dipping and airing is usually enough to richly color wool yarn, but for intense colors on cotton or silk, repeat the soaking and airing two or more times. You can put successive batches of yarn into the same dyebath, getting lighter colors each time, until the yarn no longer turns blue. Then discard the dyebath. It is safe to pour down the drain. Scrub stains from the pot.
10. After the final airing, wash and rinse the yarn.
Friday, August 15, 2008
TRIBAL EYE: Woven Gardens
This is a wonderful video about Persian carpets called "Woven Gardens". If you love weaving, carpets and dyeing you will enjoy this video that was part of the BBC television series "Tribal Eye" hosted by Sir David Attenborough. Of all the individual videos in this series this is my favorite.
It is about the nomadic Qashqai tribe of Iran and the tribal art of carpet-making in Persia and the distinctive patterns of the different clans and tribes. So get make yourself comfortable, get popcorn and something to drink, the video is 49 minutes long.
Wednesday, July 30, 2008


Sunday, July 13, 2008


Monday, June 02, 2008
WONDERFUL ITAJIME SHIBORI
The children who made this itajime shibori are from the alternative "Spanish Immersion" elementary school: Puesta del Sol, King County, WA. They learn Spanish until the 2nd grade then some English. They have an "art appreciation" program whereby parents acting as art docents would volunteer in a classroom to bring art once a month. The origin is to introduce named artists (Picasso, Matisse, etc.) and their techniques into the classroom, but as an artist, I feel that it is process and ideas that guide us in finding our work. The internet age has made this project possible. Thanks to many of you who share your talents, knowledge, passion and time.
Thanks to the pleasure of working with a classroom of kids, I am discovering new techniques and processes that I would not have otherwise. After stumbling into Shibori, I realized the simplicity and complexity of dyeing and with a little time and internet tutorials... Voila! First we made paper folding with calligraphy paper that was dipped in colored inks. Then we were able to experiment by folding and paint dye on to the folded fabrics.
Huei Huang


Friday, May 30, 2008
HIKIFUDA

A hikifuda is a handbill used in the Edo era (1603-1867) to advertise shops and products. It is called a stone block printed handbill which is believed to be printed by a lithographic stone.
Shopkeepers had a large variety of borders to choose from - immensely popular were the 7 Lucky Gods, ancient symbols, auspicious creatures, images that conveyed Japan's new "internationalism", and of course beautiful women - and new variations of these feel-good themes were added every year.
Early hikifuda were executed by the laborious technique of woodblock cutting. This eventually gave way at the close of the century to lithography or combinations of Western techniques .
This hikifuda that comes from a kimono store, features a typical bijin (beautiful woman) who is applying dye on stretched fabric for kimono.

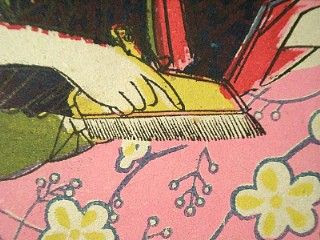
This brush called jizomebake is used for brushing large areas of dye quickly without streaks. The technique is called hikizome and is used for blending large areas of color.

A close-up of this hikifuda shows craftsmen wringing fabric that has been dyed with indigo.

Another hikifuda also features indigo dyeing.

A close-up shows a dyer dipping fabric into indigo that has been stretched on shinshi.

Thank you to www.ichiroya for the images of the hikifuda
Sunday, May 18, 2008
OUT OF ALLIGNMENT
When weaving thread that has been ikat dyed there is much that is unpredictable. It comes from the fact that the threads have been pre-dyed. The warp and weft threads have to meet to form patterns. If they are out of allignment, here are some ways to make sure warp and weft patterns allign properly.
Friday, May 02, 2008
NISHIJIN ORI-KAIKAN
Hashigo is the term for the weaving apparatus, similar to a ladder, that is mounted on a loom. It is responsible for shifting the yarn for kasuri fabric. These photographs were taken at NISHIJIN ORI-KAIKAN in Kyoto, Japan
The history of Nishijin weaving go back some 1,200 years to the founding of Heian-kyo (the old name for Kyoto) the district managed the production of textiles for court nobles, and employed weavers to produce luxury fabrics. Today walking down some of the old streets you can still hear the beat and clack of looms. Kukuri is the name for this particular type of weaving.

The loom with the hashigo. The warp yarn is dyed in different colored stripes then shifted.


Wednesday, April 16, 2008
E-KASURI OR PICTURE KASURI
This Japanese technique for weaving weft kasuri (ikat) enables very complex designs to be dyed and woven into the warp . The principle is a simple one that at first glance my seem complicated. It involves a seed thread (tane ito) or mother thread. This seed thread will be the one that will enable the weft to be woven into a design.


Slip and tape the drawing inside a frame that has nails on either side. With the thread that has been unwoven from the loom go back and forth around the nails. Leave a few inches of thread at the beginning and end for adjusting the threads.


A stencil can also be used to mark the weft repeat.


